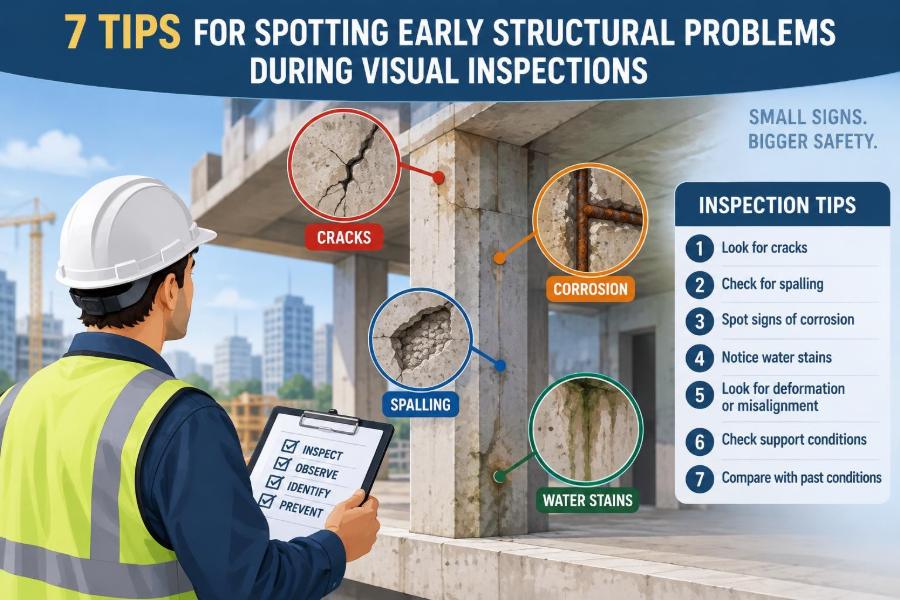

A hairline crack beside a window, a slightly sloping floor, rust staining below a balcony connection—most visual inspection concerns begin as small observations. On their own, these signs may be harmless. In the right location, however, they can be the first visible result of movement, moisture, overload, or deterioration.
For students, visual inspection is where structural theory meets real buildings. For working professionals, it is often the quickest way to identify where a closer assessment is needed before a routine maintenance issue becomes a costly repair.
The goal is not to diagnose a structure from across the room. It is to observe carefully, recognize patterns, and know the difference between a condition that should be recorded and one that should be escalated.
These seven tips provide a practical inspection mindset, along with the supporting knowledge needed to use them responsibly.
🔍 1. Begin With a System, Not a Search for Damage
An effective visual inspection is systematic. Walking through a building and noticing only the most obvious defects creates blind spots, especially where conditions are subtle or repeated.
Start outside, then move inward. Inspect from top to bottom and follow the load path: the route through which loads travel from roofs and floors, through beams, walls, columns, and foundations, into the ground.
A simple sequence is useful:
- Observe the overall building form and surroundings.
- Inspect roofs, parapets, walls, and openings.
- Follow structural members and their connections.
- Look at foundations, pavements, drainage, and nearby ground.
- Compare exterior findings with interior cracks, movement, or moisture.
This order helps an inspector connect a symptom with a possible cause. A crack in an interior wall means more when a downpipe above it is leaking or nearby ground shows signs of settlement.
🧭 Understand What Visual Inspection Can—and Cannot—Tell You
Visual inspection is a screening tool. It can reveal conditions that warrant monitoring, maintenance, investigation, or immediate protective action. It does not usually establish member capacity, reinforcement condition, foundation bearing performance, or the precise cause of movement.
For example, a concrete beam may look sound while internal reinforcement is corroding. Conversely, a fine plaster crack may look alarming but be limited to a nonstructural finish.
Describe what is seen before deciding what it means. Record location, orientation, dimensions, pattern, material, moisture condition, and any apparent recent change. Diagnosis should follow evidence, and uncertain cases should be referred to a qualified structural engineer.
📐 Establish a Baseline Before Calling Something New
A defect becomes more meaningful when it can be compared with an earlier condition. If previous photographs, condition reports, drawings, or maintenance records exist, use them.
Photograph the same view from a repeatable position. Include a scale, such as a crack gauge or ruler, and record the date. Wide shots show context; close shots show detail.
In a hypothetical apartment building, a 1 mm crack above a doorway may remain unchanged for years. If it becomes 3 mm wide over a short period, extends into adjacent finishes, or causes a door to bind, the condition has changed from an observation into an investigation priority.
🧱 2. Read Cracks as Patterns Rather Than Isolated Lines
Cracks are among the most common inspection findings, but their presence alone does not explain their significance. Materials crack for different reasons: shrinkage, temperature movement, settlement, corrosion, overload, deflection, vibration, and local restraint can all produce visible cracking.
Look for pattern, direction, width, length, depth where visible, and relation to openings or structural joints. A crack that repeats in multiple locations often says more than a single random mark.
| Observed pattern | Possible mechanism to consider | Useful follow-up observation |
|---|---|---|
| Fine, irregular surface cracking in concrete | Shrinkage or surface-related distress | Whether cracks are shallow, widespread, or associated with moisture |
| Diagonal cracks from window or door corners | Stress concentration or differential movement | Whether openings are distorted or cracks continue through the wall |
| Horizontal cracking near steel reinforcement | Possible reinforcement corrosion and expansion | Rust staining, spalling, and hollow-sounding concrete |
| Stepped cracks in masonry joints | Differential movement or settlement | Direction, progression, and changes across the building |
These are inspection clues, not automatic diagnoses. The same crack pattern can have different causes depending on material, age, loading, restraint, and environmental exposure.
↗️ Distinguish Structural Cracks From Finish Cracks Carefully
Paint, plaster, render, drywall, tile, and joint compound can crack without the supporting structure being compromised. Finish cracks often follow board joints, occur at material transitions, or remain very fine and superficial.
Do not dismiss them automatically. A finish crack that reopens after repair, crosses several materials, or aligns with a structural member may reflect movement behind the finish.
Where access is available, inspect both sides of a wall or ceiling. A crack visible only in one finish layer has a different significance from one that continues through masonry, concrete, or framing.
📏 Measure Change Instead of Relying on Memory
Terms such as “small” and “large” are not adequate records. Measure crack width where practical, identify the measurement point, and repeat the measurement under similar conditions.
Simple crack gauges can help, but measurements should not create false confidence. Crack movement can be seasonal, and a single reading cannot show whether a crack is active.
For conditions needing review, monitoring may involve dated photographs, tell-tales across a crack, level surveys, or other methods selected by an engineer. The objective is to determine whether movement is continuing and at what rate—not merely to produce more paperwork.
💧 3. Treat Water as a Structural Clue
Water is often the enabling condition behind deterioration. It can rot timber, corrode steel, reduce masonry durability through repeated wetting, weaken finishes, and contribute to soil movement around foundations.
During visual inspections, trace moisture evidence upward and outward. The wet mark on a ceiling may be below a roof defect, plumbing leak, failed flashing, overflowing gutter, or condensation source.
Look for:
- Water stains, efflorescence, mould, and peeling coatings.
- Blocked gutters, damaged flashings, and leaking downpipes.
- Ponding on roofs, balconies, or flat external surfaces.
- Missing sealant at penetrations and movement joints.
- Ground sloping toward the building or water collecting near foundations.
Efflorescence—the white, powdery deposit sometimes seen on masonry or concrete—does not prove structural damage. It does show that moisture has moved through the material and should prompt a search for the water source.
🌧️ Inspect Drainage and Ground Conditions Together
Buildings do not stand independently of their sites. Water that is poorly managed at ground level can affect basements, retaining walls, pavements, and foundation soils.
Observe whether downpipes discharge away from the building, whether drains appear blocked, and whether nearby landscaping or hardscape directs water toward walls. Also note erosion, soft ground, new depressions, or water pooling after rainfall.
Soil response varies substantially by site. Some soils change volume as their moisture content changes; others may erode or lose support when drainage is poor. A visual inspection cannot classify soil behavior, but it can identify conditions worth investigating.
🧲 4. Look Closely for Corrosion, Rot, and Material Loss
Many structural problems begin with a material losing cross-section or bond. Corrosion consumes steel, decay weakens timber, and repeated weathering can erode masonry mortar and concrete surfaces.
Rust is not always a structural emergency. Surface corrosion on a protected steel item is different from deep pitting at a critical connection. The inspection question is whether deterioration is superficial or whether it appears to affect the member, fastener, weld, bearing area, or connection.
Pay particular attention to zones that trap water: beam ends, balcony edges, base plates, parapets, embedded steel, deck connections, and the bottom of columns.
🧱 Recognize Concrete Spalling and Delamination
Spalling is the breaking away of concrete from a surface. It may expose reinforcement, create falling-object hazards, and indicate that corrosion or another deterioration mechanism is acting below the surface.
Corroding reinforcement expands relative to the original steel, placing tensile stress on surrounding concrete. This can lead to rust staining, longitudinal cracks along bars, hollow areas, and eventually detached pieces.
Do not strike concrete aggressively during a routine visual inspection. Light tapping may sometimes be used by trained personnel in suitable circumstances, but loose or overhead concrete should be treated cautiously and assessed with an appropriate safety plan.
🪵 Check Timber Where It Is Most Vulnerable
Timber performs well when detailed to stay dry and protected from biological attack. Problems are more likely where timber touches masonry, soil, wet decks, leaking roofs, or poorly ventilated cavities.
Look for staining, soft or friable areas, fungal growth, insect exit holes, sagging, split bearing zones, and damaged fasteners. A screwdriver probe can cause damage or give misleading results if used without care, so use non-destructive observations first.
Timber checks should also include connection behavior. A sound-looking joist may still be compromised if its hanger, ledger, bolts, or bearing support is corroded, loose, or inadequately supported.
🏢 5. Follow the Load Path Through the Building
A visual inspection becomes more useful when every observation is related to how the structure carries load. Roof loads transfer to rafters or trusses, then to walls or beams, then to columns or bearing walls, then to foundations.
Ask practical questions: Is a beam supported where expected? Does a column align with the support below? Has a wall opening been enlarged? Is a new heavy unit sitting on a floor that was not obviously designed for it?
Alterations commonly create uncertainty. Removing a wall, cutting a joist for services, drilling through a beam, or placing heavy storage on a mezzanine can interrupt or increase demands on the original load path.
📉 Notice Deflection, Sagging, and Out-of-Plumb Elements
Deflection is the displacement of a structural member under load. Some deflection is normal and allowed for in design; visible sagging, sudden change, or deflection associated with cracking and connection distress deserves closer attention.
Use long sight lines, a straightedge, laser level, plumb reference, or string line where appropriate. Inspectors should distinguish between a surface that appears uneven because of finishes and an underlying member that is actually deformed.
Warning combinations include a sagging beam with cracked finishes above, a floor that slopes toward one area, or a wall that is visibly out of plumb and also cracking at corners.
🔩 Examine Connections Before Assuming the Member Is Sound
Connections transfer forces between parts of a structure. A robust-looking beam is of limited value if its bolts are loose, its hanger is corroded, its weld is visibly cracked, or its bearing length has been reduced.
Inspect for missing fasteners, elongated bolt holes, corrosion, separation at plates, displaced anchors, damaged welds, and crushing at bearing points. Do not tighten, remove, or test-load components unless the work is authorized and safe.
Connection defects are especially relevant in balconies, canopies, stairs, steel frames, timber decks, and equipment supports because these areas often experience weather exposure, vibration, or repeated use.
🚪 Use Doors, Windows, and Finishes as Movement Indicators
Doors that stick, windows that no longer latch, and trim that separates from walls can be useful indicators of movement. They are not proof of a structural problem: humidity, seasonal expansion, and ordinary building aging can produce similar effects.
The value lies in correlation. If several nearby doors bind, cracks radiate from openings, and floors are no longer level, the observations form a more persuasive pattern than any one symptom alone.
Record which way an opening is distorted. A door rubbing at the top hinge side suggests a different geometry from one rubbing at the latch-side bottom corner.
🏗️ 6. Compare Similar Parts of the Structure
Buildings often contain repeated elements: columns in a car park, balcony slabs, roof trusses, window bays, retaining wall panels, or floor joists. Comparing similar components helps reveal the outlier.
If one balcony has corrosion staining while the others do not, inspect its drainage, waterproofing, exposure, and connection details. If one column shows cracking, compare its loading, impact exposure, and proximity to water with adjacent columns.
This comparative method is powerful because it reduces the risk of treating normal construction variation as a defect—or missing a genuinely unusual condition.
🧰 Inspect Recent Alterations and Added Loads
Many early problems follow a change in use rather than a failure of the original structure. New rooftop equipment, dense archive storage, water tanks, suspended services, solar installations, or partition walls can alter load distribution.
Look for new penetrations, cut members, patched openings, added supports, and equipment placed close to edges or midspans. A recent alteration is not inherently unsafe, but it should be traceable to an appropriate design review where structural capacity may be affected.
Ask whether changes have also altered water flow, fire protection, ventilation, or access for maintenance. Structural durability often depends on these surrounding systems.
🚧 Watch for Impact, Vibration, and Accidental Damage
Vehicle strikes in loading areas and car parks can damage columns, braces, guardrails, and low-level masonry. Forklifts may repeatedly impact protective barriers that are intended to shield structural supports.
Look for fresh dents, scraped paint, displaced base plates, fractured concrete, exposed reinforcement, or buckled steel. Even if the damage appears local, the member’s role in the load path should be considered.
Vibration can also affect finishes and connections, particularly near machinery, rail corridors, or repetitive industrial processes. The relevant question is whether vibration is causing progressive loosening, cracking, or fatigue-related distress.
🧱 Pay Attention to Masonry Walls and Veneers
Masonry can act as a loadbearing system, a non-loadbearing infill, or an exterior veneer. Its structural role must be understood before interpreting cracking or movement.
Check for bulging, leaning, separated wythes, open mortar joints, displaced lintels, missing ties where visible, and cracking at openings. A veneer wall may not carry the building’s primary gravity loads, but loose masonry can still create a significant falling hazard.
Do not assume a wall is nonstructural because it appears thin or because it has been painted. Drawings, construction knowledge, and professional assessment may be needed to establish its role.
🧗 Assess Balconies, Canopies, and Other Exposed Projections
Projecting elements are exposed on multiple surfaces and often have critical connections that are partly concealed. Their drainage details matter because water can reach embedded reinforcement, steel supports, or timber framing.
Inspect undersides as well as top surfaces. Look for ponding, cracked coatings, rust staining, spalls, dripping joints, loose railings, separation at wall connections, and visible deflection.
If there is substantial spalling, exposed reinforcement, pronounced movement, or concern about connection integrity, restrict access as appropriate and seek urgent professional advice. Avoid placing additional loads on the element while its condition is uncertain.
🕳️ Do Not Ignore Retaining Walls and Site Structures
Retaining walls resist lateral soil pressure as well as carrying their own weight. Their performance is strongly influenced by drainage, surcharge loads above the wall, foundation conditions, and wall geometry.
Bulging, tilting, cracking, open joints, blocked weep holes, erosion at the base, or water accumulating behind the wall are meaningful observations. New vehicles, stockpiles, landscaping, or construction near the top can increase loading.
Because retaining wall failure can be sudden and affect people or adjacent property, visible movement should be assessed promptly rather than treated as a cosmetic issue.
🗺️ Record Location, Orientation, and Context
A note saying “crack in wall” is difficult to use later. A better record identifies the building, room or elevation, gridline or reference point, height above floor, crack direction, dimensions, and adjacent features.
Use a sketch or marked-up plan when possible. Note weather conditions for moisture-related observations and identify whether an area was inaccessible, concealed, or obstructed.
Good records make handovers safer and allow a later inspector to determine whether a condition has progressed. They also separate observed facts from interpretation, which is essential when several people are involved.
📸 Take Photographs That Support, Rather Than Replace, Notes
Photographs are strongest when they answer basic questions: Where is this? What am I looking at? How large is it? When was it observed?
For each significant condition, take a contextual image, a medium-range image, and a close-up with a scale where safe. Avoid using a hand as the only scale because its size and position are inconsistent.
Images can distort perspective, particularly with wide-angle lenses. A photograph of a wall may make a slight lean look severe, or hide it entirely. Use photographs alongside direct observations and measurements.
⚠️ 7. Know Which Findings Need Immediate Escalation
Some observations should not wait for the next routine report. Priorities depend on occupancy, member function, likelihood of falling material, and evidence of active movement.
Examples that warrant prompt escalation include:
- Sudden or rapidly developing cracking, displacement, or sagging.
- Exposed, heavily corroded, or fractured structural components.
- Loose concrete, masonry, cladding, or other overhead material.
- Visible instability in retaining walls, balconies, stairs, guardrails, or canopies.
- Damage to columns, braces, or supports after impact, fire, flooding, or severe weather.
- New separation at critical connections or obvious loss of bearing.
If there is a credible immediate danger, keep people away from the area and follow the organization’s emergency and reporting procedures. A visual inspector should not enter an unsafe space to obtain a better photograph.
🛑 Put Personal Safety Before Inspection Completeness
Inspections can expose people to falls, traffic, electrical hazards, confined spaces, unstable materials, hazardous coatings, and poor access conditions. The best observation is not worth an injury.
Plan access before arrival. Use required personal protective equipment, respect exclusion zones, and avoid climbing on roofs, ladders, scaffolds, or structures without appropriate training, authorization, and fall protection.
When a condition cannot be inspected safely, record the limitation. “Not inspected due to unsafe access” is more professional than guessing from a distance.
🧠 Avoid Common Interpretation Traps
One frequent mistake is treating every crack as structural failure. Another is the opposite: assuming a defect is old and harmless because it has paint over it or because the building remains occupied.
Other traps include confusing correlation with cause, overlooking hidden conditions, and focusing on dramatic defects while missing poor drainage or a damaged connection that is driving the problem.
Useful discipline includes:
- Observe first; interpret second.
- Seek patterns across materials and locations.
- Compare with previous records and similar elements.
- State uncertainty clearly.
- Escalate when the consequence of being wrong is high.
🧪 Use Further Investigation Proportionately
Visual findings may lead to a more detailed assessment, but not every stain or crack needs invasive testing. The next step should be proportionate to the condition, uncertainty, exposure, and consequences.
A structural engineer may recommend measurements, level surveys, material testing, reinforcement location methods, moisture investigation, trial openings, or review of original drawings. Each method has limits and should be selected to answer a defined question.
The purpose is not to collect data for its own sake. It is to establish the cause, extent, and significance of a condition well enough to make an informed decision.
🔧 Turn Observations Into Clear Actions
An inspection report should lead to action, not merely list defects. Separate findings into practical categories such as monitor, maintain, investigate, repair, restrict access, or seek urgent advice.
For example, a blocked gutter may need routine maintenance; recurring moisture staining may need investigation of the water path; spalling concrete above a public walkway may require immediate risk control and specialist assessment.
State what is known, what is uncertain, and what triggered the recommendation. This makes decisions easier for owners, facilities teams, contractors, and engineers.
📚 Build Your Recognition Skills Over Time
Pattern recognition improves through repeated observation. Review drawings before inspection when available, compare your findings with completed repair work, and discuss uncertain conditions with experienced engineers.
Students can practice by tracing load paths in ordinary buildings and asking why cracks appear near certain openings or why water stains form below particular details. Professionals can improve consistency through checklists, repeat photography, and lessons learned from maintenance histories.
Experience should increase curiosity, not overconfidence. Buildings often contain concealed details, undocumented alterations, and material-specific behavior that cannot be resolved by appearance alone.
✅ The Core Principle: Observe Patterns, Then Escalate Wisely
Early structural problem spotting is less about finding one dramatic sign and more about connecting small pieces of evidence. Cracks, water, corrosion, distortion, altered load paths, and damaged connections become meaningful when they occur together or change over time.
The seven tips are a practical cycle: inspect systematically, read cracks in context, follow moisture, identify material deterioration, trace the load path, compare repeated elements, and escalate conditions with potential safety consequences.
Visual inspection works best as part of a wider maintenance and engineering process. It identifies where attention should go next, while recognizing the limits of what can be concluded without detailed assessment.
Careful observation does not replace engineering judgment, but it is often the first step that allows engineering judgment to arrive in time. 🏗️🔍🧱