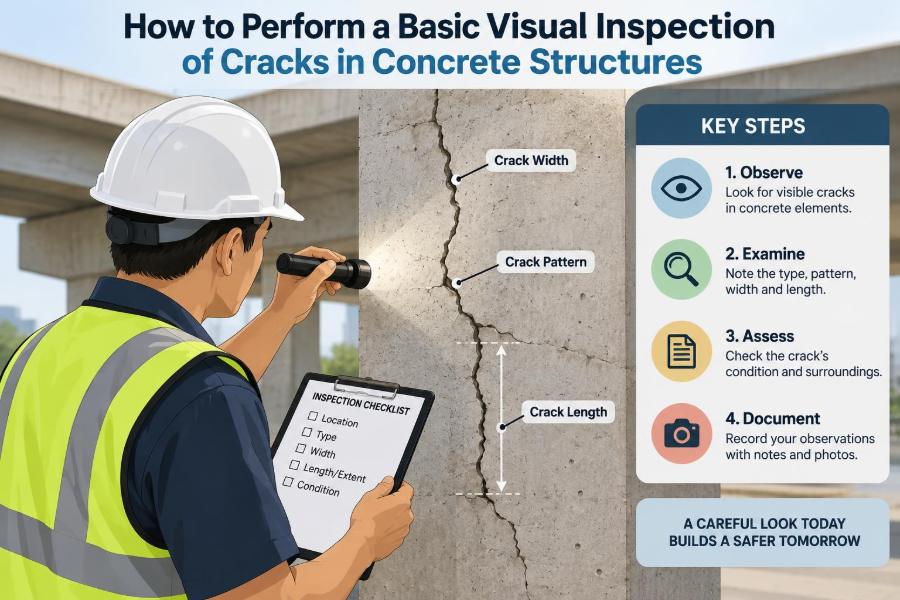

A hairline mark on a garage slab, a diagonal line beside a window, or a crack on the underside of a beam can prompt the same uneasy question: is this merely a surface defect, or is the structure trying to tell us something?
Concrete cracks for many reasons. Some occur as fresh concrete dries and contracts. Others reflect movement, corrosion, excessive loading, poor detailing, or changes in the supporting ground. A visible crack is therefore an observation, not a diagnosis.
A basic visual inspection helps turn a vague concern into useful information. By observing a crack systematically, recording its features, and recognizing warning signs, an owner, student, or site professional can make a more proportionate next decision.
Visual inspection has limits. It cannot confirm reinforcement condition, internal voids, foundation capacity, or the exact cause of movement. Still, it is usually the right first step: careful looking often determines whether monitoring is sensible or whether prompt assessment by a qualified structural engineer is warranted.
🔎 Start With the Right Purpose
The purpose of a visual crack inspection is to document what can be seen safely and consistently. It is not to declare a structure safe, unsafe, or structurally sound from one glance.
A good inspection answers practical questions: Where is the crack? What element contains it? What is its direction, approximate width, length, and condition? Is there evidence that it is active or worsening?
That record creates a baseline. If the crack changes later, comparison with the baseline is far more useful than relying on memory.
🧱 Understand What Concrete Cracking Means
Concrete is strong in compression but relatively weak in tension. When restrained shrinkage, bending, settlement, temperature movement, or another action produces tensile stress beyond the material’s capacity, cracking can occur.
This does not mean every crack is a structural failure. Reinforced concrete is commonly designed with the expectation that limited cracking may occur under service loads, while steel reinforcement carries much of the tension across the crack.
The inspection question is therefore not simply, “Is there a crack?” It is, “What pattern and context does this crack present, and does that pattern suggest a condition needing further evaluation?”
🦺 Put Personal Safety Before Observation
Do not inspect locations that expose you to falling materials, traffic, electrical hazards, unstable ground, confined spaces, or work at height without appropriate training and controls. A photograph from a safe position is better than a close look obtained by taking a risk.
Keep clear of visibly loose concrete, especially overhead. Concrete that has separated from its substrate may fall with little warning.
If you see pronounced deflection, a member that appears displaced, broken reinforcement, large areas of spalling, or a rapidly widening crack, limit access to the affected area and seek urgent professional advice. Do not strike, load-test, or attempt a repair to “see what happens.”
🗺️ Identify the Structural Element First
Before studying the crack itself, identify the element in which it occurs. A crack in a thin slab-on-ground is interpreted differently from one in a suspended slab, retaining wall, column, beam, masonry infill panel, or foundation wall.
Record the element’s location and role. For example, note whether a wall retains soil, whether a slab spans between supports, or whether a beam carries a floor above. The load path—the route by which loads travel to the ground—gives essential context.
A crack in a nonstructural plaster finish may mirror movement below it, but it may also be confined to the finish. Looking for corresponding cracking on adjacent or opposite surfaces can help distinguish these possibilities.
📋 Assemble Simple Inspection Tools
A basic kit does not need to be elaborate. Its value lies in making observations repeatable rather than merely descriptive.
- Notebook or digital form for dated observations
- Camera or phone with sufficient lighting
- Ruler or tape measure for scale
- Crack width gauge, or a clear comparator card where available
- Flashlight for shaded faces and soffits
- Marker or removable reference label, only where permitted
- Clean, dry brush for loose dust; do not aggressively scrape the concrete
Never use a coin, fingernail, or a distant object as the only scale in a photograph. Their size is uncertain to a later reviewer.
📸 Create a Useful Photographic Record
Take photographs in sequence. Start with a wide image showing the room, facade, or structural bay. Then photograph the full element. Finally, take close-ups of the crack with a ruler or crack gauge placed beside it.
Maintain orientation. A photo of a crack is much more useful if the record says “north face of ground-floor retaining wall, near the southwest corner” rather than simply “wall crack.”
Avoid relying on a flash alone, which can flatten shallow surface features. Side lighting from a flashlight may make crack edges and small offsets more visible. Use it cautiously and do not mistake a shadow for a crack.
📏 Measure Width at More Than One Point
Crack width often varies along its length. Measure or estimate the widest visible point and, where useful, representative narrower points. Write down the method used: for example, “compared against 0.5 mm line on crack gauge.”
Width is one clue, not a complete severity rating. A very narrow crack that is growing or leaking can deserve attention, while a stable wider shrinkage crack in a lightly loaded slab may present a different concern.
For a meaningful trend, repeat measurements at the same locations using the same method. Marking measurement stations on a sketch is usually more reliable than trying to identify them from photographs alone.
↔️ Record Length, Direction, and Shape
Trace the visible path on a sketch and record its approximate length. Note whether it is horizontal, vertical, diagonal, curved, map-like, branching, or concentrated at a corner or opening.
Direction can relate to the actions affecting the member. For example, flexural cracks in a beam often appear roughly vertical in regions of bending, while diagonal cracks may be associated with shear-related stress patterns. These are general patterns, not proof of cause.
Also note whether the crack terminates at a joint, edge, opening, construction interface, or previous repair. Boundaries often concentrate movement.
🧭 Read Crack Orientation in Context
Vertical cracks in walls can result from drying shrinkage, thermal movement, settlement, or other causes. Horizontal cracking in a retaining wall deserves careful context because lateral earth pressure, reinforcement corrosion, or movement at supports may be relevant.
Diagonal cracks are particularly worth documenting around doors, windows, beam ends, and wall corners. Differential movement frequently concentrates at openings because the material has less continuous area to distribute stress.
Orientation alone cannot diagnose a problem. A diagonal crack in decorative render and a diagonal crack that passes continuously through a concrete wall, with visible displacement, do not carry the same implications.
📐 Look for Offset Across the Crack
Check whether one side of the crack sits higher, lower, forward, or backward relative to the other. This is called displacement or offset. It may be easier to observe by holding a straightedge across the crack or using low-angle light.
Offset suggests that movement has occurred across the crack plane. In a floor slab, a ridge or step can create a trip hazard even if the structural cause is limited. In a wall or beam, displacement can be more significant and merits professional review.
Do not force a straightedge against fragile edges. The aim is observation, not disturbance.
💧 Check for Water, Dampness, and Deposits
Water changes the significance of many cracks. Note whether a crack is damp, actively leaking, stained, or associated with white crystalline deposits. These deposits, often called efflorescence, can form when water carries dissolved salts to the surface and then evaporates.
Efflorescence does not by itself establish structural damage, but it indicates moisture movement. In reinforced concrete, repeated water entry can increase the chance of corrosion conditions developing if protective alkalinity or cover is compromised.
Record weather conditions and recent rainfall when leakage is observed. A crack that remains dry in ordinary conditions but leaks after heavy rain provides a different investigative clue than one linked to plumbing use.
🧂 Look for Corrosion Clues
Rust staining, narrow cracks parallel to reinforcement, delamination, and spalling can indicate reinforcement corrosion. Delamination means the concrete has detached internally in a layer, sometimes producing a hollow-sounding area when assessed by trained personnel.
As steel corrodes, corrosion products can occupy more volume than the original steel. The resulting expansive pressure may crack and push away the surrounding concrete cover.
Do not assume every rust stain comes from embedded reinforcement; a nearby steel fixture can stain the surface. But where staining, cracking, and broken cover occur together, prompt professional assessment is sensible because the effective reinforcement and bond may be affected.
🧩 Distinguish Surface Crazing From Deeper Cracks
Crazing is a network of fine, shallow surface cracks, often resembling a map or dried mud. It commonly affects the cement-rich surface layer and may be related to finishing, rapid drying, or curing conditions.
Surface crazing can be visually undesirable and may affect finish durability, but it is not automatically evidence of deep structural cracking. A close inspection may show that the fine lines do not continue through the member.
Conversely, a single defined crack that continues through a slab edge, appears on both faces of a wall, or allows water through the element is less likely to be merely superficial.
🌡️ Consider Temperature and Shrinkage Movement
Fresh concrete loses moisture and undergoes drying shrinkage. If it is restrained by reinforcement, adjoining members, subgrade friction, or geometry, tensile stresses can produce cracks. Temperature changes can create similar restraint effects as concrete expands and contracts.
Long slabs and walls often include joints to accommodate movement and encourage cracking in planned locations. A crack near a joint may indicate that movement was not fully accommodated, that the joint is blocked, or simply that cracking followed a weaker line nearby.
Inspection should include joints: note sealant condition, opening, debris, broken arrises, and whether the crack crosses where a joint should allow movement.
🏠 Recognize Settlement-Related Patterns Carefully
Differential settlement occurs when one part of a structure or its support moves more than another. It can produce cracks that run diagonally from openings, stepped cracking in masonry, sticking doors, sloping floors, or separation at interfaces.
No single sign proves settlement. Seasonal ground moisture changes, material shrinkage, poorly restrained finishes, and local construction details can produce similar visible symptoms.
Concern rises when several compatible signs occur together or when change is ongoing: for example, a crack widens, a door frame distorts, and a nearby floor develops a noticeable slope. Such combined evidence deserves engineering evaluation.
🏗️ Notice Load-Related Crack Locations
Cracks in structural members should be related to supports and loading. In a simply supported beam, bending tension is commonly greatest near midspan on the underside. Near supports, diagonal cracking may have a different relationship to shear forces.
In a suspended slab, look for cracks under concentrated loads, near columns, at re-entrant corners, and along lines of support. A crack’s location may be more informative than its width alone.
A visual inspection cannot determine whether a member has adequate capacity. However, cracks that are new after a change of use, added equipment, removed wall, vehicle impact, or unusual loading should be treated as a reason to seek design review.
🚪 Inspect Openings, Corners, and Interfaces
Openings interrupt the flow of stress through a wall. Their corners are common places for cracks to start because stress can concentrate there, much as a tear in paper often begins at a notch.
Also inspect where different materials meet: concrete beside masonry, steel, timber framing, render, or sealant. Materials move differently with moisture and temperature, so small interface cracks may be expected in some details.
The key distinction is whether the separation remains a narrow, stable finish issue or whether it is accompanied by displacement, water entry, distortion, or cracking extending into the structural concrete.
🔄 Decide Whether a Crack May Be Active
An active crack is one that is changing over time. A dormant crack is not showing measurable change under the conditions observed. One inspection cannot reliably make this distinction; it establishes only a starting point.
Useful evidence of potential activity includes fresh edges, recently opened sealant, recurring leakage, debris falling from the crack, or a change reported after a particular event. These observations are suggestive, not conclusive.
Monitoring is often more informative than immediate cosmetic repair. Filling a crack before recording it can hide evidence and make later movement harder to detect.
📍 Set Up Basic Crack Monitoring
For a crack that appears suitable for observation rather than urgent action, establish fixed reference points. Date the baseline, photograph it, and remeasure at planned intervals and after relevant events such as heavy rainfall, temperature changes, or construction nearby.
Simple tell-tales can indicate relative movement when properly installed and interpreted, but they do not diagnose the cause. Commercial crack monitors may be appropriate for accessible, low-risk locations; installation should not damage the element or conceal important features.
Record more than width. Include leakage, offset, length extension, nearby door operation, surface condition, and environmental events. A pattern of change is usually more useful than a single measurement.
📝 Use a Consistent Inspection Log
A practical log prevents observations from becoming scattered photos with no context. It should be clear enough that another person can find the crack and repeat the check.
| Record item | What to note |
|---|---|
| Location | Element, level, face, grid or nearby fixed landmark |
| Geometry | Length, direction, branching, crack width locations |
| Condition | Dry, damp, leaking, stained, spalled, offset, repaired |
| Context | Recent work, loading change, weather, impact, nearby excavation |
| Trend | Date, repeat measurement, photographs, observed change |
Use factual language. “Crack measured approximately 0.4 mm at point A” is better than “serious crack,” unless an appropriately qualified person has made that assessment.
🖊️ Make a Clear Crack Sketch
A simple hand sketch can outperform many close-up photographs. Draw the element outline, label dimensions where known, show supports or openings, and map the crack path with arrows indicating width changes or displacement.
Include a north arrow or viewing direction for external work. For a beam, mark which face is shown and whether the drawing represents the top, side, or soffit.
Sketches are particularly useful when cracks branch, intersect, or occur as a network. They make it easier to see whether later cracking expands from an earlier pattern.
⚠️ Know the Warning Signs That Need Prompt Advice
Some observations justify faster escalation rather than routine monitoring. The appropriate response depends on the building, element, occupancy, and condition, but caution is warranted when a crack is associated with clear distress.
- Rapidly changing crack width, length, or offset
- Visible sagging, rotation, separation, or loss of support
- Cracked or crushed concrete around columns, beam supports, or connections
- Exposed, bent, or heavily corroded reinforcement
- Spalling or loose concrete where people may pass below
- New cracking after impact, fire, flooding, excavation, or major loading change
- Significant water ingress through a structural element, especially with corrosion signs
If immediate danger is suspected, follow local emergency procedures and restrict access where it can be done safely. A remote diagnosis from photos should not replace an on-site assessment of a potentially unstable structure.
👷 Know When to Call a Structural Engineer
Engage a qualified structural engineer when cracking affects primary load-bearing elements, accompanies displacement or deformation, appears after an unusual event, or cannot reasonably be explained and monitored as a surface condition.
Engineers may combine the visual record with drawings, load information, measurements of level or deflection, non-destructive testing, cover-meter surveys, material sampling, or targeted openings. The right method depends on the question being asked.
Providing a well-organized inspection log saves time and improves the first conversation. It does not replace professional judgment, but it gives that judgment better evidence.
🛠️ Avoid Premature Cosmetic Repairs
Crack fillers, sealants, coatings, and patch repairs have different purposes. Some are intended to keep water out; others restore a finish; some specialized repairs may bond structural cracks. Selecting a product without understanding movement and cause can lead to early failure.
For example, a rigid filler may crack again if the joint is moving. Covering a damp, leaking crack without addressing the water path can trap moisture or merely redirect it.
Before repair, document the crack thoroughly. If engineering review is likely, ask whether monitoring, moisture investigation, corrosion assessment, or cause correction should occur first.
🧹 Do Not Confuse Maintenance With Diagnosis
Cleaning drains, maintaining sealants, fixing leaks, and preventing standing water are sensible durability measures. They can reduce future deterioration even when they do not explain an existing crack.
Likewise, repainting a wall may improve appearance but tells little about structural behavior. If a crack reappears through paint, the recurrence itself is information worth recording.
Separate the tasks in your mind: maintenance manages exposure; diagnosis identifies the mechanism; repair addresses the consequences and, ideally, the cause.
🚫 Common Visual Inspection Mistakes
The most frequent mistake is treating width as the only measure of seriousness. Context, movement, location, water, displacement, and the function of the member matter just as much.
- Photographing without a scale or location reference
- Comparing pictures taken from different angles and distances
- Assuming all hairline cracks are harmless
- Assuming all visible cracks indicate structural failure
- Ignoring underside surfaces, edges, joints, and adjacent elements
- Measuring once and claiming the crack is stable
- Covering the crack before making a record
A disciplined inspection is deliberately modest about what it can conclude. That restraint is a strength, not a limitation.
🏢 Example: A Crack in a Residential Garage Slab
Consider a hypothetical garage slab with a thin crack running several metres across the floor. The crack is dry, has no perceptible vertical step, and appears near a saw-cut control joint. The owner records its width, photographs it with a scale, and checks whether the joint is filled with debris.
This observation could be consistent with shrinkage-related cracking in a slab-on-ground, but visual evidence alone does not establish that conclusion. The owner should also observe whether the crack changes, whether it admits water, and whether there are signs of soil movement, slab rocking, or widening separation at walls.
If a step develops, movement progresses, or vehicle loading and drainage conditions raise concerns, the case for professional review becomes stronger.
🏘️ Example: Diagonal Cracking Near a Window
In another hypothetical example, a diagonal crack extends from the upper corner of a window through an internal finish. The first task is to establish whether the crack is only in plaster or also visible in the concrete or wall substrate outside.
Check nearby openings for sticking, examine both sides where accessible, and look for a pattern of similar cracking. A single finish crack may relate to local drying or interface movement, whereas matching cracks with frame distortion and broader building movement indicators require a different level of investigation.
The lesson is simple: inspect the system around the crack, not only the line itself.
🏭 Example: Cracks and Rust on a Parking Structure Soffit
Imagine cracks on the underside of a parking deck accompanied by rust staining and areas where concrete cover has broken away. Water and de-icing salts, where used, can contribute to reinforcement corrosion exposure in such environments.
This is not a suitable situation for casual patching from a ladder. Loose material creates an overhead hazard, and the visible condition may extend beyond what can be seen at the surface.
The correct visual-inspection outcome is a well-documented record, safe access control where needed, and timely assessment by suitably qualified professionals who can determine the extent and repair strategy.
📚 Keep Design Intent in Mind
Construction drawings, specifications, past repair records, and maintenance history can greatly improve interpretation. They may identify intended joints, reinforcement zones, waterproofing details, prior movement, or modifications that explain why a crack occurs in a particular place.
Do not assume drawings match the finished structure exactly, especially in older buildings or altered facilities. Treat them as evidence to be checked against what is observed.
For students, this is an important professional habit: visual inspection connects field conditions to design intent, but neither should be interpreted in isolation.
🧠 Build a Proportionate Response
A sensible response matches the observed risk. Minor, stable, dry surface cracking in a noncritical finish may require documentation and planned maintenance. Cracking with water entry may call for investigation of drainage and sealing. Cracking with displacement, spalling, or distress in a load-bearing member may need urgent engineering input.
Proportionate does not mean dismissive. It means using evidence to choose the next step rather than reacting only to appearance or anxiety.
When uncertainty remains, err toward obtaining qualified advice for occupied buildings, public areas, critical infrastructure, or any condition where failure could harm people.
✅ The Core Principle of a Good Crack Inspection
A basic visual inspection is a process of structured observation: identify the element, view the wider context, document geometry and condition, look for related signs, and monitor change where appropriate.
It cannot replace analysis, calculations, testing, or professional judgment. Its real value is that it turns an isolated mark into a usable evidence record and helps distinguish routine observation from a condition that should be escalated.
The most useful question is not “How bad does this crack look?” but “What does this crack, its location, and its change over time tell us about the structure?”
Observe carefully, record objectively, and seek qualified help whenever cracking is associated with movement, deterioration, water, or uncertainty in a load-bearing element. That measured approach protects both the structure and the people who rely on it. 🏗️🔎🦺