Fillet welded joints such as ‘T’, lap and corner joints are the most common connection in welded fabrication. In total they probably account for around 80% of all joints made by arc welding.
It is likely that a high percentage of other joining techniques also use some form of a fillet welded joint including non-fusion processes such as brazing, braze welding and soldering. The latter techniques are outside the scope of this article.
Although the fillet weld is so common, there are a number of aspects to be considered before producing such a weld. This article will review a number of topics that relate to fillet welded joints and it is hoped that even the most seasoned fabricator or welding person will gain from this article in some way.
Common joint designs for fillet welds are shown below in Fig.1.
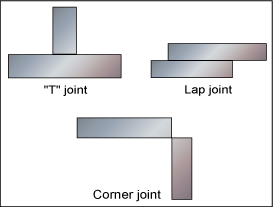
Fig 1. Common joint designs for fillet welds
Fillet weld features
BS EN ISO 2553 uses the following notation as Figs. 2 and 3 show.
a = throat thickness
z = leg length
s = deep penetration throat thickness
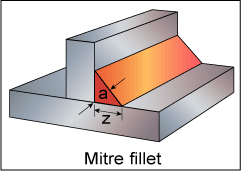
Fig. 2. Mitre fillet
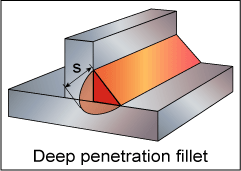
Fig 3. Deep penetration fillet
Fillet weld shapes
Over specified fillet welds or oversized fillet welds
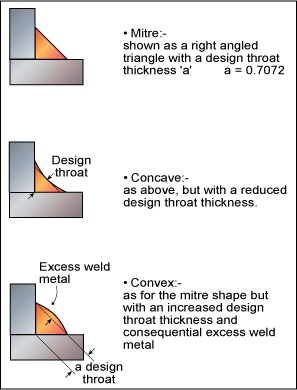
Fig 4. Weld sizes in relation to the required leg lengths or throat thickness
One of the greatest problems associated with fillet welded joints is achieving the correct weld size in relation to the required leg lengths or throat thickness (Fig.4).
The designer may calculate the size and allow a ‘safety factor’ so that the weld specified on the fabrication drawing is larger than is required by design considerations.
The weld size is communicated by using an appropriate weld symbol.
In the UK the weld size is frequently specified by referring to the leg length ‘z’ in EN ISO 2553 where the number gives the weld size in millimetres as shown in Fig.5.

Fig 5. Weld size specification (UK)
In Europe, it is more common to find the design throat thickness, ‘a’ specified ( Fig.6).

Fig 6. Weld size specification (Europe)
Once the drawing has been issued to the shop floor, it is usual to find an additional safety factor also being applied on by the welder or inspector. It is also common to hear ‘add a bit more it will make it stronger’.
The outcome is an oversized weld with perhaps an 8mm leg length rather than the 6mm specified by the designer. This extra 2mm constitutes an increase in weld volume of over 80%.
This coupled with the already over specified weld size from the designer’s ‘safety factor’ may lead to a weld that is twice the volume of a correctly sized fillet weld.
By keeping the weld to the size specified by the drawing office, faster welding speeds can be achieved, therefore increasing productivity, reducing overall product weight, consumable consumption and consumable cost.
The other benefit is that, in the case of most arc welding processes, a slight increase in travel speed would in most cases see an increase in root penetration so that the actual throat thickness is increased:
An oversized weld is therefore very costly to produce, may not have ‘better strength’ and is wasteful of welding consumables and may see other fabrication problems including excessive distortion.
Lap joints welded with fillet welds.
As discussed earlier, oversized welds are commonplace and the lap joint is no exception. The designer may specify a leg length that is equal to the material thickness as in Fig.7.
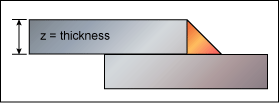
Fig 7. Lap joint – leg length specification
Strength considerations may mean that the fillet weld size does not need to be anywhere near the plate thickness. In practice the weld may also be deficient in other ways, for example:
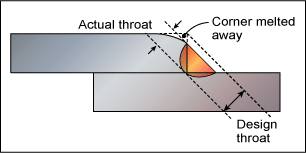
Fig 8. Example showing an undersized fillet weld, often termed a ‘no weld’ in some specifications
Due to melting away of the corner of the upper plate (Fig.8), the vertical leg length is reduced meaning that the design throat has also been reduced; therefore an undersized weld has been created. Care is therefore needed to ensure that the corner of the upper plate is not melted away. Ideally the weld should be some 0.5-1mm clear of the top corner (Fig.9).
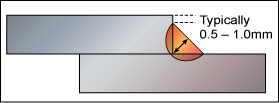
Fig 9. Ideally the weld should be 0.5-1mm clear of the top corner
The designer may therefore specify a slightly smaller leg length compared to the thickness of the component.
To compensate for this reduction in throat thickness it may be necessary to specify a deep penetration fillet weld. This amount of additional penetration would need to be confirmed by suitable weld tests. Additional controls may also be needed during production welding to ensure that this additional penetration is being achieved consistently.
In addition to the reduction in throat thickness there is the potential for additional problems such as overlap at the weld toe due to the larger weld pool size (Fig.10) or an excessively convex weld face and consequential sharp notches at the weld toe (Fig.11).
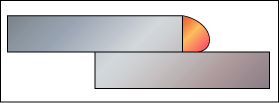
Fig 10. Overlap at the weld toe due to the larger weld pool size
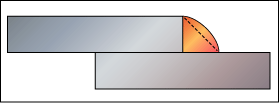
Fig 11. Excessively convex weld face and consequential sharp notches at the weld toe
Both the potential problems shown in Figs.10 and 11 could adversely influence the fatigue life of the welded joint due to the increased toe angle, which acts as a greater stress concentration. Root penetration is also commonly reduced in single-pass welds that exhibit such shapes.
Poor fit-up can also reduce the throat thickness as in Fig.12. The corner of the vertical component has been bevelled in the sketch in an exaggerated manner to illustrate the point.
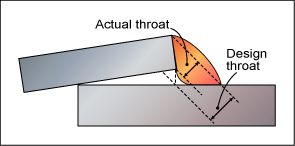
Fig 12. Throat thickness may be reduced by poor fit-up
