Abstract:
Aircraft and chemical processing equipment are now required to work at subzero temperatures and the behavior of metals at temperatures down to -150°C needs consideration, especially from the point of view of welded design where changes in section and undercutting at welds may occur.
Steel Properties at Low Temperatures
Aircraft and chemical processing equipment are now required to work at subzero temperatures and the behavior of metals at temperatures down to -150°C needs consideration, especially from the point of view of welded design where changes in section and undercutting at welds may occur.
An increase in tensile and yield strength at low temperature is characteristic of metals and alloys in general. Copper, nickel, aluminium and austenitic alloys retain much or all of their tensile ductility and resistance to shock at low temperatures in spite of the increase in strength.
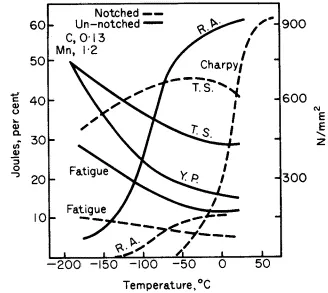
In the case of unnotched mild steel, the elongation and reduction of area is satisfactory down to -130°C and then falls off seriously. It is found almost exclusively in ferritic steels, however, that a sharp drop in Izo-d value occurs at temperatures around 0°C (see Figs. 1 and 2).
The transition temperature at which brittle fracture occurs is lowered by:
· a decrease in carbon content, less than 0,15% is desirable
· a decrease in velocity of deformation
· a decrease in depth of `notch`
· an increase in radius of `notch`, e.g. 6 mm minimum
· an increase in nickel content, e.g. 9%
· a decrease in grain size; it is desirable, therefore, to use steel deoxidized with aluminium normalized to give fine pearlitic structure and to avoid the presence of bainite even if tempered subsequently
· an increase in manganese content; Mn/C ratio should be greater than 21, preferably 8.

| Figure 1. | (a) Yield and cohesive stress curves |
| (b) Slow notch bend test | |
| (c) Effect of temperature on the Izod value of mild steel |

Figure 2. Effect of low temperatures on the mechanical
properties of steel in plain and notched conditions
Surface grinding with grit coarser than 180 and shot-blasting causes embrittlement at -100°C due to surface work-hardening, which, however, is corrected by annealing at 650-700°C for 1 h. This heat-treatment also provides a safeguard against the initiation of brittle fracture of welded structures by removing residual stresses.
Where temperatures lower than -100°C or where notch-impact stresses are involved in equipment operating below zero, it is preferable to use an 18/8 austenitic or a non-ferrous metal.
The 9% Ni steel provides an attractive combination of properties at a moderate price. Its excellent toughness is due to a fine-grained structure of tough nickel-ferrite devoid of embrittling carbide networks, which are taken into solution during tempering at 570°C to form stable austenite islands. This tempering is particularly important because of the low ferrite-austenite transformation temperatures.
A 4% Mn Ni (rest iron) is suitable for castings for use down to -196°C. Care should be taken to select plates without surface defects and to ensure freedom from notches in design and fabrication. Fig. 3 shows tensile and impact strengths for various alloys.

Figure 3. Tensile and impact strengths of various alloys at subzero temperatures
Steel Properties at High Temperatures
Creep is the slow plastic deformation of metals under a constant stress, which becomes important in:
1. The soft metals used at about room temperature, such as lead pipes and white metal bearings.
2. Steam and chemical plant operating at 450-550°C.
3. Gas turbines working at high temperatures.
Creep can take place and lead to fracture at static stresses much smaller than those which will break the specimen when loaded quickly in the temperature range 0,5-0,7 of the melting point Tm.
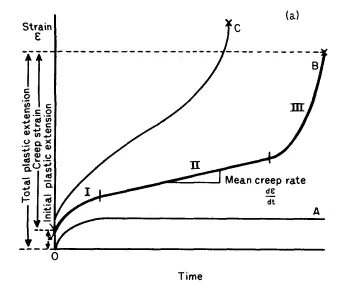
The Variation with time of the extension of a metal under different stresses is shown in Fig. 4a. Three conditions can be recognized:
· The primary stage, when relatively rapid extension takes place but at a decreasing rate. This is of interest to a designer since it forms part of the total extension reached in a given time, and may affect clearances.
· The secondary period during which creep occurs at a more or less constant rate, sometimes referred to as the minimum creep rate. This is the important part of the curve for most applications.
· The tertiary creep stage when the rate of extension accelerates and finally leads to rupture. The use of alloys in this stage should be avoided; but the change from the secondary to the tertiary stage is not always easy to determine from creep curves for some materials.


| Figure 4. | a) Family of creep curves at stresses increasing from A to C |
| b) Stress-time curves at different creep strain and repture |
The limited nature of the information available from the creep curve is clearer when a family of curves is considered covering a range of operating stresses.
As the applied stress decreases the primary stage decreases and the secondary stage is extended and the extension during the tertiary stage tends to decrease. Modifying the temperature of the test has a somewhat similar effect on the shape of the curves.
Design data are usually given as series of curves for constant creep strain (0,01-0,03%, etc.), relating stress and time for a given temperature. It is important to know whether the data used are for the secondary stage only or whether it also includes the primary stage (Fig. 4b).
In designing plants that work at temperatures well above atmospheric temperatures, the designer must consider carefully what possible maximum strains he can allow and what the final life of the plant is likely to be. The permissible amounts of creep depend largely on the article and service conditions. Examples for steel are:
| Rate of Creep mm/min | Time, h | Maximum Permissible Strain, mm | |
| Turbine rotor wheels, shrunk on shafts | 10-11 | 100000 | 0,0025 |
| Steam piping, welded joints, boiler tubes | 10-9 | 100000 | 0,075 |
| Superheated tubes | 10-8 | 20000 | 0,5 |
In designing missiles data are needed at higher temperatures and stresses and shorter time (5-60 min) than are determined for creep tests. This data is often plotted as isochronous stress-strain curves.
Creep tests
For long-time applications it is necessary to carry out lengthy tests to get the design data. It is dangerous to extrapolate from short time tests, which may not produce all the structural changes, e.g. spheroidation of carbide. For alloy development and production control short time tests are used.
Long time creep tests
A uniaxial tensile stress is applied by the means of a lever system to a specimen (similar to that used in tensile testing) situated in a tubular furnace and the temperature is very accurately controlled. A very sensitive mirror extensometer (of Martens type) is used to measure creep rate of 1×10⁻⁸ strain/h. From a series of tests at a single temperature, a limiting creep stress is estimated for a certain arbitrary small rate of creep, and a factor of safety is used in design.
Short time tests
The rupture test is used to determine time-to-rupture under specified conditions of temperature and stress with only approximate measurement of strain by dial gauge during the course of the experiments because total strain may be around 50%. It is a useful test for sorting out new alloys and has direct application to design where creep deformation can be tolerated but fracture must be prevented.


